Showing posts with label WordPress. Show all posts

[Social Internet from Original Internet] সকল সিম এর সোস্যাল এমবি প্যাক দিয়ে সব চাইতে সহজ পদ্ধতিতে ইন্টারনেটের যাবতীয় কাজ করুন।[কনফিগ ছাড়া][Psiphon pro vpn


অনেক দিন পর আপনাদের মাঝে আসতে পেরে অনেক ভালো লাগছে।
আজকে আপনাদের সাথে একটা সুন্দর কাজ শেয়ার করবো।
টাইটেল দেখেই হয়তো বুঝে গেছেন সবাই।
যারা জানেন তাদের থেকে আরো সহযোগিতা চাই।আর যারা জানেনা তাদের জানাতে চাই।

এখন কাজের কথায় আসি।

কিছু কথা:

যে পোষ্ট গুলো হয়েছে তা হয়তো নির্দিষ্ট কোন সিম বা VPN এর কনফিগ ব্যাবহার করে।
কিন্তু আজ আমি যে পদ্ধতি টি দেখাবো তা সকল সিমের সোস্যাল প্যাক দিয়ে VPN এর কোন কনফিগ ছাড়াই সরাসরি খুব সহজে এক ক্লিকেই চালু হয়ে ইন্টারনেট এর সকল কাজ চলবে।
******তো কথা না বারিয়ে কাজের কথায় যাই। ********
♥♥এখানে আমি পর্যাপ্ত পরিমান স্ক্রিনশট দিয়েছি।♥♥
তবুও না বুঝতে পারলে পোষ্টে কমেন্ট করবেন। বুঝিয়ে দেওয়ার চেষ্টা করবো।
♥♥♥আমি ট্রিকবিডির হয়ে সারাক্ষণ আপনাদের পাশেই আছি ও থাকবো।♥♥
♦♦আশা করি সবাই ভালো ভাবেই বুঝতে পারবেন।♦♦

তো প্রথমে:

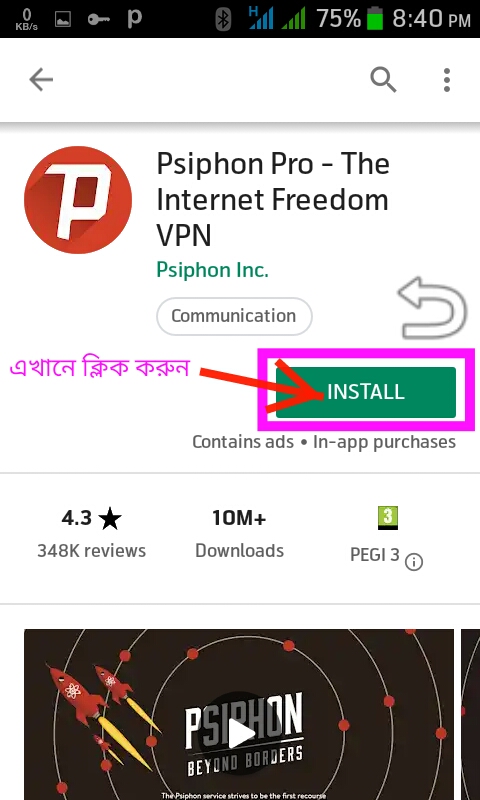
আপনারা প্লে-স্টোরে গিয়ে
psiphon লিখে সার্চ করলে নিচের এ্যাপ্সটি পাবেন।
এখন ইন্সটলে ক্লিক করে আপনার ফোনে ইন্সটল করে নিন।
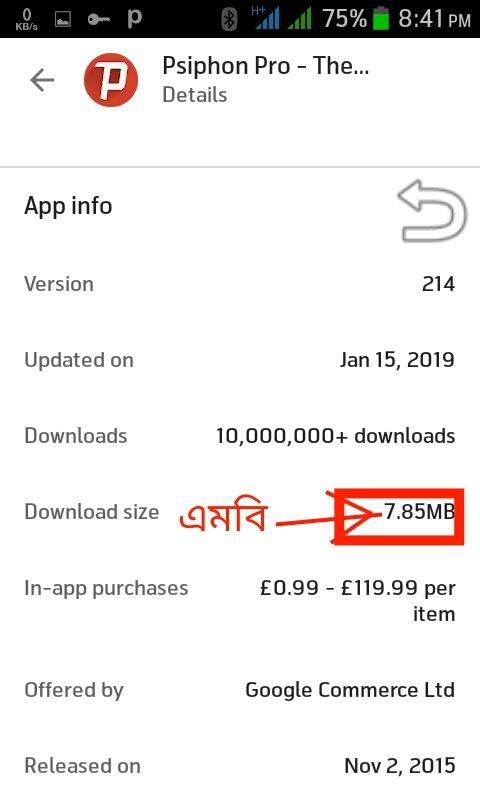
খুব বেশি এমবি না।
মাত্র. 7.85 এমবি।
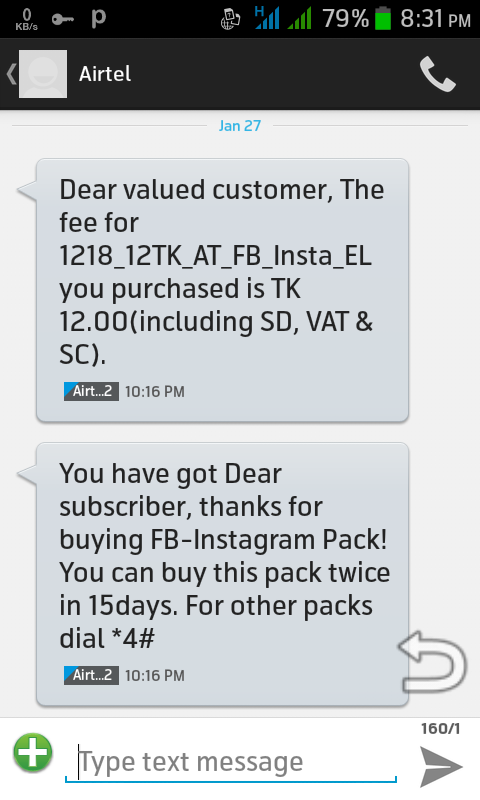
এখন আপনারা যেকোন সিমে যেকোন ধরনের সোস্যাল এমবি প্যাক কিনুন।
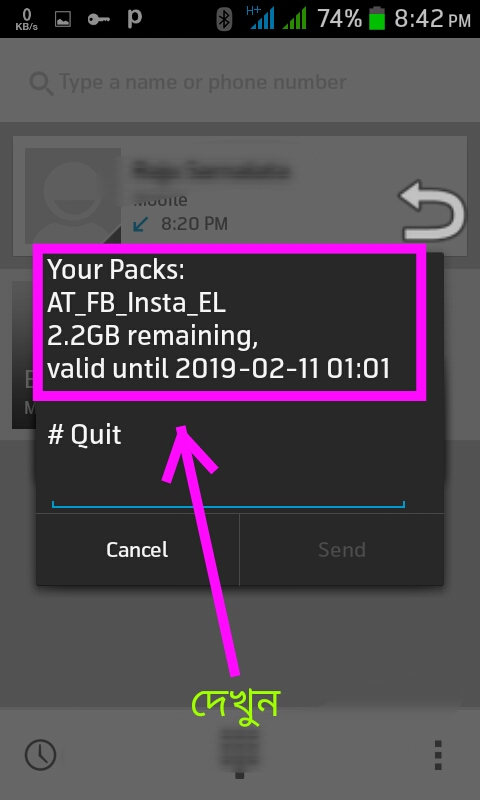
আমি এখানে এয়ারটেল সিমে ১২ টাকায় ১৫ দিন মেয়াদে ৩ জিবি সোস্যাল প্যাক কিনেছি।
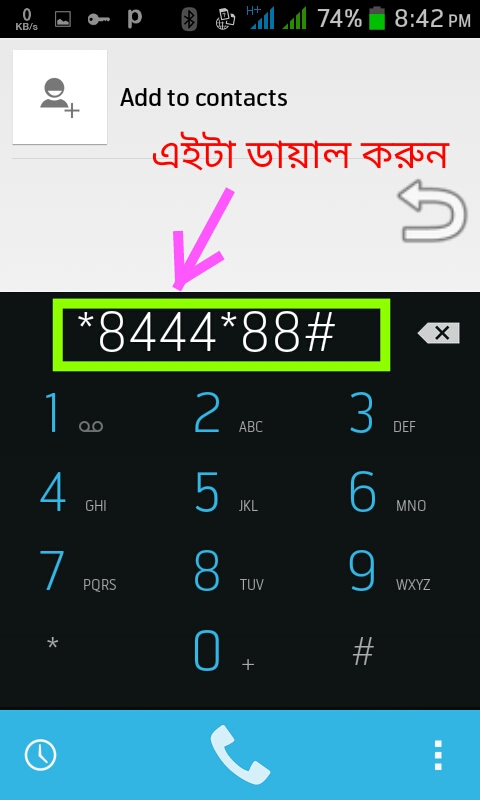
আমি আমার সোস্যাল এমবি চেক করে দেখাচ্ছি।
দেখুন ৩ জিবি এর মধ্যে এখন এই এমবি আছে।
এখন আপনারা
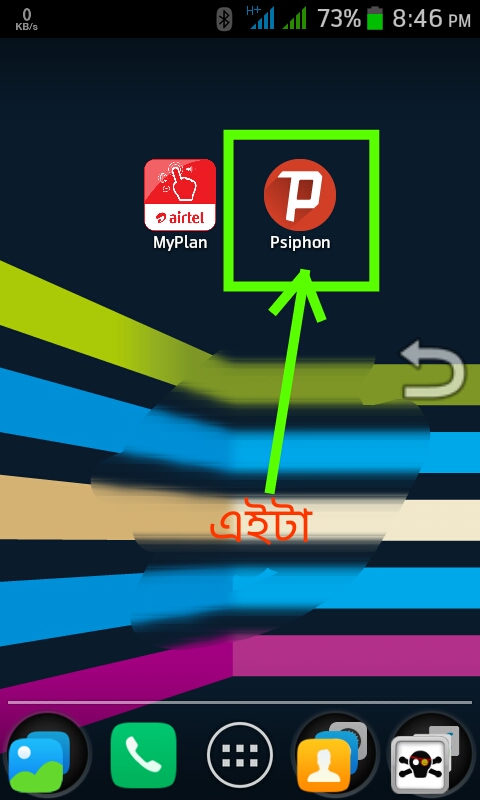
এই psiphon এ্যাপ এ প্রবেশ করুন।
তারপর
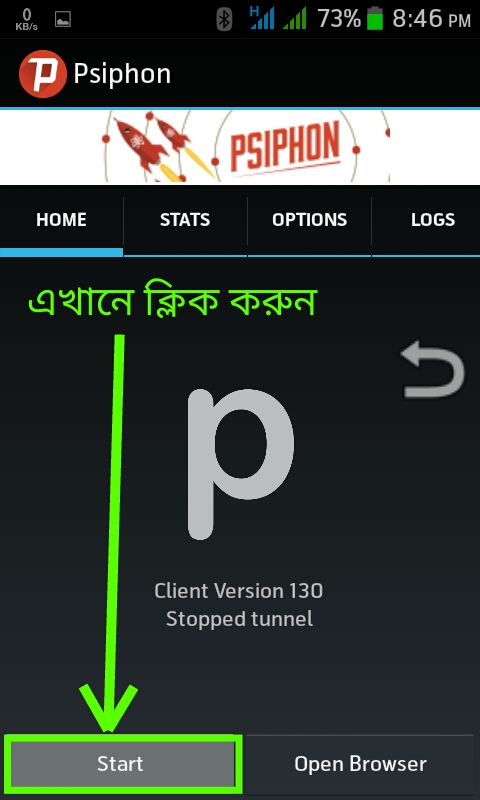
এই রকম একটা ব্যাকগ্রাউন্ড আসলে নিচের দিকে বামপাশে Start লেখাতে ক্লিক করুন।
দেখবেন ৫/৭ সেকেন্ডের মধ্যেই উপরের নোটিফিকেশন বারে একটা চাবি চিহ্ন দেখা যাচ্ছে।
এই রকম আসলে বুঝবেন কানেক্ট হয়েছে।
এখন আপনারা আপনাদের ইন্টারনেট এর যাবতীয় কাজ করতে থাকুন।
দেখুন আমি ইউটিউব চালাচ্ছি।
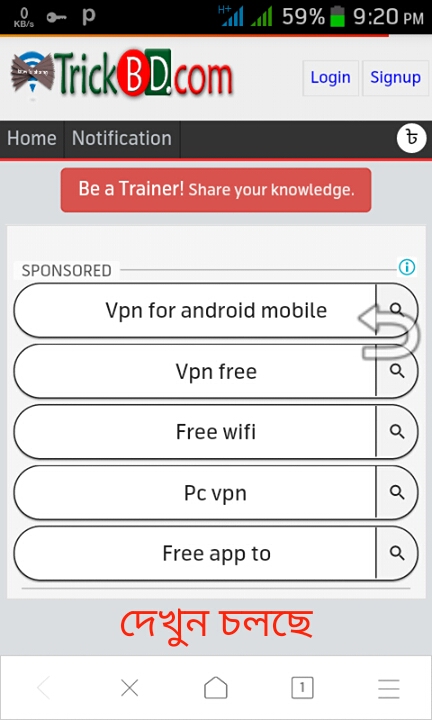
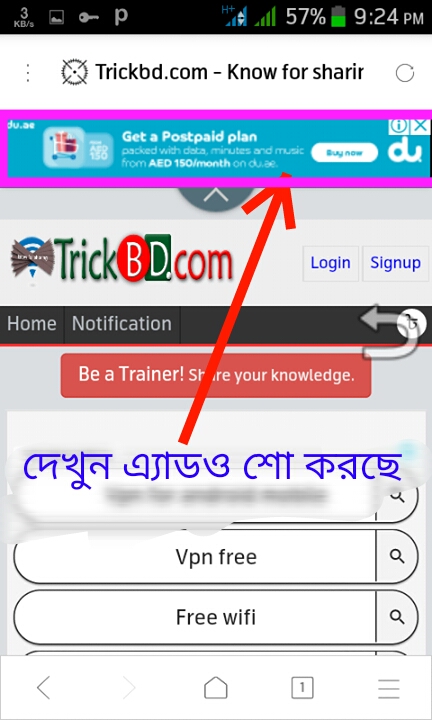
আবার দেখুন আমি ট্রিকবিডি সাইটে ঢুকেছি।
দেখুন এ্যাড শো করছে।
[বি:দ্র: এই ভাবে নেট চালাতে সিমে টাকা না রাখাই ভালো। টাকা কেটে নিতে পারে।
আর আপনার এলাকার নেটওয়ার্ক এর উপর এর স্পিড নির্ভর করবে ]

♥♥আশা করি আপনাদের বিষয়টি ভালভাবে বোঝাতে পেরেছি।♥♥
ভুল হলে ক্ষমা করবেন ও ভুল দেখিয়ে দিবেন।
আজ এই পর্যন্তই।
সবাই ভালো থাকুন সুস্থ থাকুন।
আর ট্রিকবিডির সাথে থেকে অনেক কিছু জানুন।

আর সবার কাছে অনুরোধ

কিভাবে ব্লগার ব্লগের পোস্ট ফটোকে SEO ফ্রেন্ডলি করবেন !!

আসসালামু আলাইকুম বন্ধুরা , ব্লগার SEO খুবি গুরুত্ব পূর্ণ একটি বিষয় এটা সবাই যানে কিন্তু আমারা অনেকেই যানি না ব্লগারের অনেক হিডেন SEO টিপস আছে যেগুল ঠিক ভাবে নিয়মিত করলে আপনার ব্লগ সার্চ ইঞ্জিনে অবশ্যই একটা ভাল জাইগাই যাবে সেরকম আজকের এই টিপস । ব্লগিং করার সময় আমারা সবাই পোস্টে বিভিন্ন দরকারি ফটো ব্যবহার করি এখুন আপনি চাইলে সেই সব ফটো গুললির খুব সহজে সার্চ ইঞ্জিনে ভাল ফল পেতে পারেন বিশেষ করে গুগল ইমেজ বা ইয়াহু ইমেজ এ কেউ যদি কোন ফটো সার্চ করে এবং আপনি যদি আপনার ব্লগ ফটোকে ভাল ভাবে SEO করতে পারেন তাহলে অবশ্যই ভাল ফল পাবেন সঙ্গে ভিজিটর ও ভাল পাবেন । সেই রকম একটি ব্লগার ব্লগে অপশন আছে Alt ট্যাগ যার দ্বারা আপনি আপনার ব্লগ পোস্ট ফটোতে কিছু দরকারি কীওয়ার্ড দিতে পারবেন যেটা ইমেজ সার্চ ইঞ্জিনে খুবি গুরুত্ব পূর্ণ , আজকে আমি আপনাদের সেটাই দেখাব কিভাবে ফটোতে Alt ট্যাগ ব্যবহার করবেন


কিভাবে ব্লগার ব্লগের পোস্ট ফটোকে SEO ফ্রেন্ডলি করবেন !!

কিভাবে alt ট্যাগ ব্যবহার করবেন !


প্রথমে আপনি ব্লগার ড্যাশবোর্ড এ যান নতুন পোস্ট লিখতে শুরু করুন এবার ফটো আপলোড করুন এবার সেই ফটোতে ক্লিক করুন তাহলেই দেখুন একটা মেনু বারের মত অপশন আসবে সেখান থেকে Properties এ ক্লিক করুন ।


কিভাবে ব্লগার ব্লগের পোস্ট ফটোকে SEO ফ্রেন্ডলি করবেন !!


উপরের মত Properties এ ক্লিক করলেই আপনি একটি পপআপ পাবেন সেখানে title text: এর যাইগাই আপনার ব্লগ পোস্ট টাইটেলটি দিয়ে দিন এবং alt text: যাইগাই আপনি সেই ফটো সম্পর্কে কিছু কীওয়ার্ড লিখুন ।


কিভাবে ব্লগার ব্লগের পোস্ট ফটোকে SEO ফ্রেন্ডলি করবেন !!


এক্ষেত্রে অবশ্যই বুঝে কীওয়ার্ড গুল দিবেন আশাকরি বুঝতে পেরেছেন আমি আপনাকে কি বোঝাতে চেয়েছি তারা ছাড়া আপনি যদি চান ব্লগার বাদে যেকোনো প্লাট ফর্মে এই alt ট্যাগ ব্যবহার করবেন তাহলে নিচের alt ট্যাগ code ব্যবহার করতে পারেন সেটা Blogge বা Wordpress ও হতে পারে । এটা আপনি কাস্টম ভাবে ব্যবহার করতে চাইলে HTML হিসাবে নিচের কোড গুল ব্যবহার করবেন আপনার পোস্টে ।


< img src ="আপনার ফটো URL" alt="আপনার ফটো alt ট্যাগ"></img>


ব্যাস হয়েগেল আশাকরি পোস্টটি বুঝতে কোন রকম সমস্যা হলনা কোন রকম সমস্যা হলে অবশ্যই আমাকে নিচে কমেন্ট করতে পারেন পোস্টটি কোন ভুল হলে অবশ্যই ধরিয়ে দিবেন । ভাল লাগলে বন্ধুদের সঙ্গে শেয়ার করুন । ভাল থাকবেন সুস্থ থাকবেন ।

LinkedIn Ads


You'll find the new integration in your standard left-hand side navigation, in the existing "Ads" section.
Navigation
We base our new feature releases almost entirely on customer feedback and, now that we've gotten caught up on our integrations, with recent releases like Bing Webmaster ToolsGoogle My Business Insights, and Reviews analytics, LinkedIn Ads is our number one currently most requested integration. We hope you guys are as excited as we are to get it checked off the list!
So without further ado, let's take a quick tour, shall we?
Similar to our other PPC integrations, we've organized our LinkedIn Ads reporting dashbardinterface by Campaigns, Ads, and Demographics.
Tabs
Enable whichever metrics make sense for you and your customers by clicking the "settings slider".
Settings Slider
Available metrics for both the Campaigns and Ads tabs include:
  • Clicks
  • Impressions
  • Cost
  • CPC
  • CPM
  • CTR
  • Conversion Value
  • Conversions
  • Conversion Rate
  • Engagements
  • Follows
  • Likes
  • Shares
  • Types
  • Status
We highly encourage you to make liberal use of those conversion metrics to show your clients exactly how you're impacting their bottom line and ROI!
Filter by campaign type to simplify large data sets and view each campaign type separately. Similar to the metrics above, filters are available under the "settings slider".
Filters
Graph any metric on the fly - over time and by campaign - by clicking the appropriate widget.
Scroll down to review granular data for both Campaigns and Ads. Each ad even features an image of the actual ad itself! (This functionality is coming soon to our other PPC integrations).
GIF
Jump over to the demographics tab to analyze ad data by Industry, Company Size, Country, Seniority, Job Title, and Job Function. Above the fold, you'll find a graphical analysis of demographic trends.FiltersScroll down for a detailed analysis across a wide variety of metrics.FiltersAnd of course, we wouldn't leave you hanging when it comes to including LinkedIn Ads in your automated reports! Just drill down through Ads --> LinkedIn Ads --> then choose the specific sections to include.
GIF
What's that? You want to add widgets to your marketing dashboards too? We've got you covered with a variety of widget styles, including Stats, Sparkline Charts, Line Charts, Bar Charts, Pie Charts, and more.
Filters
Would your clients benefit from a dedicated LinkedIn Ads dashboard maybe?FiltersOr even better, what about a PPC Dashboard with LinkedIn Ads data alongside your Adwords, Facebook Ads, and Bing Ads data? So many possibilities!
As always, we hope that this new integration brings you another step closer to having all of your reporting - for every marketing channel that you use - under one roof.
Not a member yet? Click here to start a free 14-day trial (no credit card required!)
Questions? Comments? Don't hesitate to reach out!
x
x

How to Install Google Analytics on Blogger

Wouldn’t it be nice to know how many people actually visited your blog each day? How about knowing which of your posts are the most popular? Well surprisingly Blogger doesn’t currently offer any native blog analytics but fortunately there is Google Analytics — available for free.
Google Analytics is a great tool that will show you all sorts of useful information about how people found your blog, keywords they searched on to find you, where they came from and even how long they stayed. You’ll learn more about where your visitors come from and how they interact with your blog. This is a must tool if you are trying to build a profitable blog otherwise you are flying blind!
This article will show you how to add Google Analytics to your Blogger blog. It’s a fairly simple process and doesn’t require any technical skill at all.

Step #1 – Setup a Google Analytics Account

Go to Google Analytics and sign in using your Blogger login. If your account doesn’t work for some reason, you can create a new one instead. Once you login you’ll see a screen that looks like this:
Google Analytics Blogger Sign Up Step 1
Click on the “Sign Up >>” button and proceed to the next step which will ask you for your general information. Website URL, Account Name, Country, and Time Zone. The screen will look like this:
Google Analytics Blogger Step 2
If you noticed, I just put my Blogger url (without the http://) and called it “David’s Account” because this is your top-level container for 1 or 100 different websites so it’s a good idea to name it something more general. The next step will ask you for your contact information which includes your first name, last name, phone number, and country. Easy so far right? 🙂
Google Analytics Blogger Step 3
Your last step in signing up will ask you to accept the user agreement terms and conditions which you should read (just kidding…who actually ever reads these entire legal terms anyhow?).
Google Analytics Blogger Step 4
Now this next screen is very important. This is the code you will need to copy and paste into your blogger template. Go ahead and click into the box and it will automatically highlight the entire block of code for you. Now you need to copy that code and paste it into notepad or into a MS Word document. Save it as you’ll need to use it later.
Google Analytics Blogger Step 5
After you click on the “continue >>” button you will be taken to your brand new Google Analytics dashboard! You will see your blogger blog listed but with no analytical data….yet.
Google Analytics Blogger Dashboard
Ok, now you are done with setting up your Google Analytics account. The next step is placing the tracking code into your Blogger template so it can report back to Google Analytics and provide you with some cool data points.

Step #2 – Adding GA Tracking Code to Your Blogger Template

This is not a very difficult step even if you are afraid to touch your template code. Login to your Blogger account and then click on the “Layout” => “Edit HTML” tabs. This will bring you to the template code. Before you make any changes, I advice you to back up your template just in case there are any problems. After you’ve done so, continue reading.
Now in the edit template html code window, scroll all the way to the bottom of your template code and look for the </body> tag. There should only be one of these closing tags in your template. If you can’t find it then your template wasn’t properly created and you should add one right above the </html> tag.The </html> tag should always be your last line of code in your template. It signifies the end of your template.
Ok, now go back to the code you saved before in a Word Doc from Google Analytics. You are going to copy it and paste it right above the </body> tag as illustrated in the image below. The yellow highlighted code is the new GA code I just pasted into my template.
blogger google analytics code 2
Save your template and you shouldn’t get any error messages. If you do, it’s most likely not related to this GA code and something else with your template itself. Assuming you’ve been successful with your save, you are all done embedding the GA code in your template!

Step #3 – Confirm Google Analytics is Tracking

Go back into your Google Analytics account and look at your dashboard. Most likely you will see a little yellow exclamation mark under the “status” column that looks like this: google analytics tracking not installed. This means everything isn’t working properly yet which is fine because we are about to tell GA we just added the code. From your dashboard, click on the “edit” link which is located to the far right.
Google Analytics Blogger Dashboard Edit
After you click on that link, you’ll see another screen like below. It will say “Tracking Not Installed” followed by a link “Check Status”. You’ll want to go ahead and click on that link which will tell GA to visit your site and look for the new code you just pasted in your template.
Google Analytics Blogger Dashboard Check Code
Assuming you pasted the code in there as instructed above, GA will find the new code and begin tracking everything on your blog. If you are still having problems, it’s most likely something to do with GA and you should read their help guide to troubleshoot your problem.
Google Analytics Blogger Dashboard Success
The message seen here, “Waiting for Data” means you have correctly setup GA and data is being gathered! Click on the top left Google Analytics logo and it will take you back to your dashboard. From there click on the “View report” link and that’s where all your very important Blogger visitor data will start appearing!
Google Analytics Blogger Dashboard Results
Now it usually takes an hour or so before you will see any data (maybe longer if you don’t get much traffic to your blog) so please be patient. Trust me, you’ll be logging in at least once a day just to see how much traffic your blog is getting. It’s very addicting and powerful information to learn from. You’ll be surprised which posts are your most popular and what countries people are coming from to read your blog.
Google Analytics is very powerful and we have just learned how to install it into your Blogger template. We haven’t even scratched the surface on the features and reporting it can do. For most Bloggers, this will be enough. Data will be collected and you will just review it. Others with more in-depth goals (like selling products or services, creating a sales funnel, etc) will want to spend more time learning GA. Hope you enjoyed the tutorial and don’t blame me for your new found addiction!
Ready to super charge your blog? Check out our professional premium blogger templates or make money by joining our blog affiliate program!
If you like this post then please consider subscribing to our eBlog Templates RSS feed. You can also subscribe by email and have new templates and articles sent directly to your inbox

WORDPRESS Engaging Your Readers: Here Are The 8 Best Comment Plugins For WordPress

Creating an active comments section on your blog is difficult, but it is one aspect that you should work on as your blog grows.
Not only do blog comments help you engage with your readers, they can even help your site rank better on Google, at least according to my experience.
To help make it easier to create an engaging comments section on your blog, you can find lots of helpful WordPress plugins. They are, in fact, available in such huge numbers that you might feel overwhelmed trying to find the absolute best options.
To help, I’ve collected 8 of the best comment plugins for WordPress.
Some of these are standalone plugins that make huge changes to your comments section, while others have smaller features that you can combine with some of the other plugins on this list.

8 Top WordPress Comment Plugins For More Engagement

1. Thrive Comments
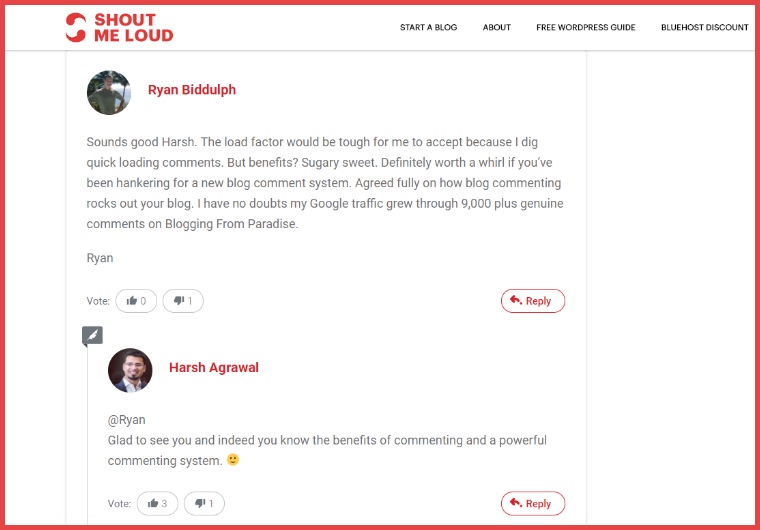
Thrive Comments is a relatively new plugin from the stable of Thrive Themes. It is actually the exact comments system that we use here at ShoutMeLoud – so if you want to see it in action, just scroll down.
You can also read my Thrive Comments review for a more in-depth look at how the plugin works.
Thrive Comments integrates with the native WordPress comments system to add a completely new interface:
Thrive Comments for WordPress
Add caption
All your old comments will continue to work in the new interface. And if you ever deactivate the plugin, your comments will go back to the normal version displayed by your theme.
In addition to the new design, Thrive Comments adds helpful engagement-boosting features like:
  • Upvotes and downvotes on comments like Reddit (you can also just use upvotes if you don’t like the negative aspect of downvotes)
  • Social login for comments
  • Custom gamification badges for things like numbers of comments or upvotes
There are also a couple of other neat features like:
  • The option to display a custom message or offer after a user leaves a comment. Great for boosting social shares, promoting offers, or building your email list.
  • A custom moderation panel that makes it easy to control your comments
  • Analytics for your comments section
2. No Self Pings
No Self Pings is a simple plugin that helps keep your comments section free of clutter.
By default, every time that you link to an internal post on your WordPress site, your site will leave a pingback on the post that you linked to.
If you’re following good SEO principles and including lots of internal links, this can quickly start cluttering up your comments section with lots of pingbacks.
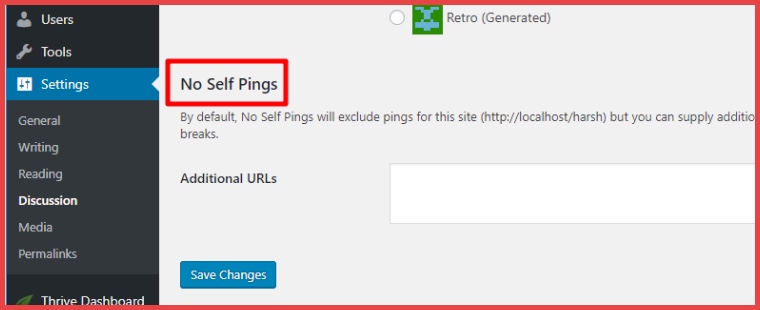
When you install and activate this plugin, you’ll get a new box when you go to Settings → Discussion that lets you enter domains to exclude from pings. By default, the plugin already includes your own domain name, but you can also add additional domain names if you want to exclude external websites:
No Self Pings
Add caption
3. Jetpack Comments
Jetpack Comments is a module in the all-purpose Jetpack plugin that replaces your blog’s comment form with a new form that lets visitors use social login to comment on your site.
It doesn’t affect how your theme displays comments – it just affects the form that your readers use to actually leave comments.
Visitors can still use the default “Email, Name, Website” method, but they also gain social login buttons for:
  • Facebook
  • Twitter
  • Google+
  • WordPress.com
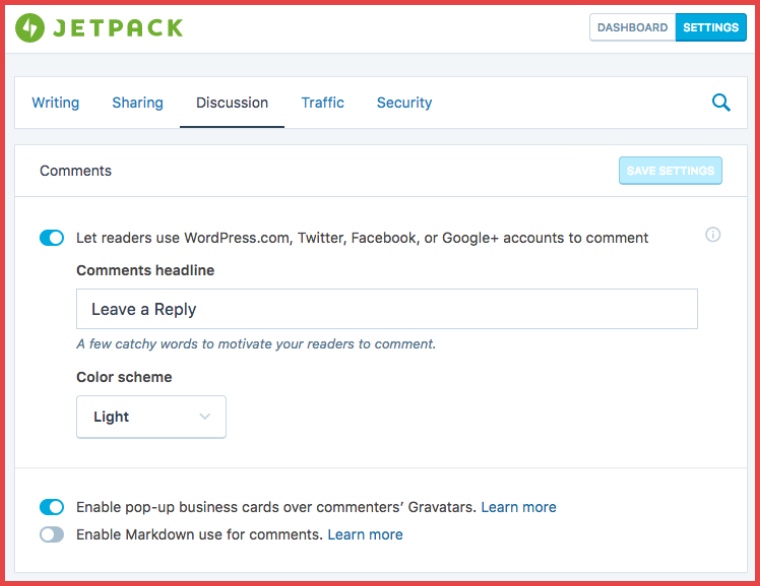
Another benefit that Jetpack Comments comes with is the ease of use to enable in comparison to other social login plugins. Most plugins make you create a Facebook App before you start accepting social login, but with Jetpack you just need to click a single button:
Jetpack WordPress Plugin
Add caption
Consider Jetpack if you already like how your comments section looks but just want to improve the comments form and include a social login.
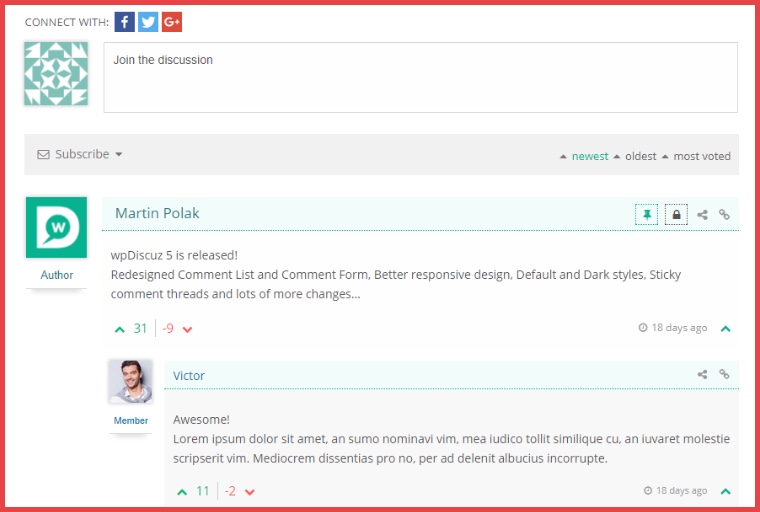
4. wpDiscuz
As the name suggests, wpDiscuz aims to offer many of the same features of the Disqus comments platform in a WordPress-specific plugin.
Similar to Thrive Comments, it completely replaces your comments section design with a new one.
Here’s what the default styling looks like (they also have some other style options, though):
wpDiscuz
Add caption
In addition to the new design, here are some other features that wpDiscuz adds to your comments section:
  • Comments voting (just like Reddit and Thrive Comments)
  • Comments sorting for visitors can find new, old, or most-voted comments
  • Multi-level nested comments so that visitors can more easily follow specific comment threads
  • AJAX “Load More Comments” button so that visitors can load more comments without needing to reload the page
  • Anonymous users can edit comments (but only for a timeframe that you set)
  • Social share buttons for users to share comments
  • Option for commenters to subscribe to your email list
There are also a lot of smaller features in wpDiscuz. If you’re interested, I encourage you to check out the demo.
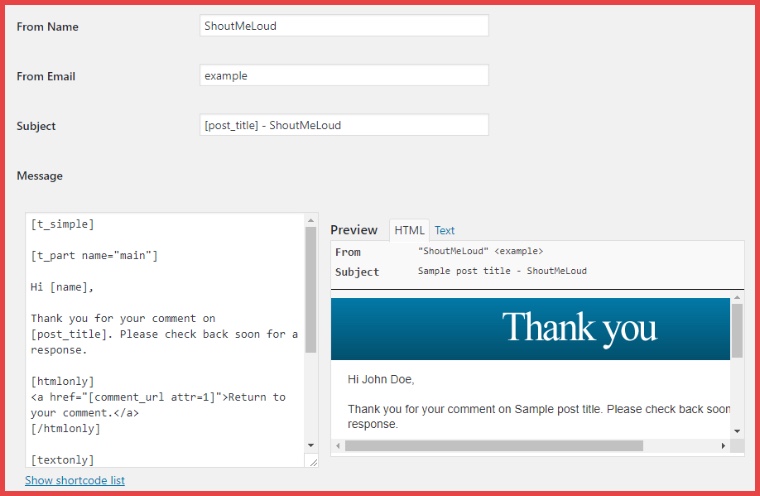
5. Thank Me Later
Thank Me Later lets you connect with your commenters via email after they leave a comment on your site.
The plugin lets you automatically send an email to your commenters at a specific time after they leave a comment. You can specify the timeframe – so this could be 5 minutes or 5 days after they leave a comment.
You can use this email to:
  • Simply thank your readers for the comment
  • Promote something (like your social media profiles or a special offer)
What’s cool is that you can also use shortcodes in your emails to automatically insert the commenter’s name, which gives your thank you email a more personalized touch:
Thank Me Later WordPress Plugin
Add caption
If desired, you can also create different thank you emails for different categories on your site.
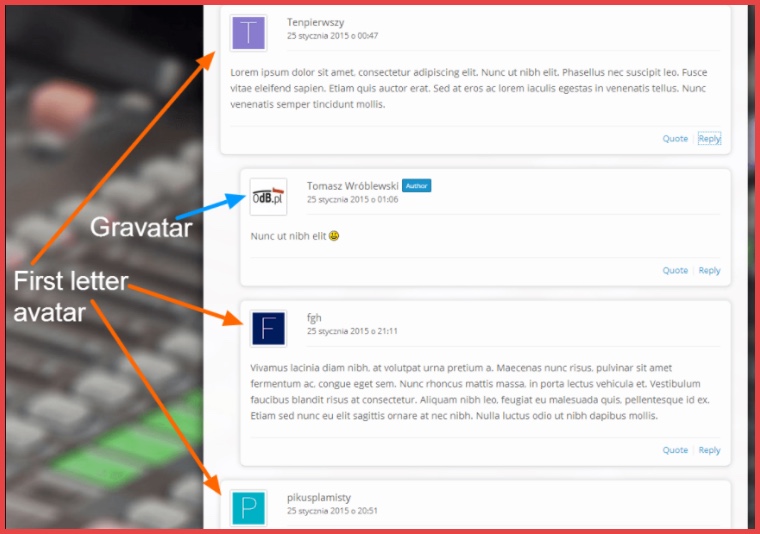
6. WP First Letter Avatar
By default, WordPress displays a grey “Mystery Person” avatar whenever a user doesn’t have a Gravatar image associated with their email.
WP First Letter Avatar helps you avoid a bunch of anonymous grey “Mystery Person” boxes by adding an avatar with the first letter of the commenter’s name when WordPress can’t find a Gravatar image:
WP First Letter Avatar
Add caption
While the plugin comes with its own set of letters, you can also upload your own images to use for each letter if you really want to personalize things.
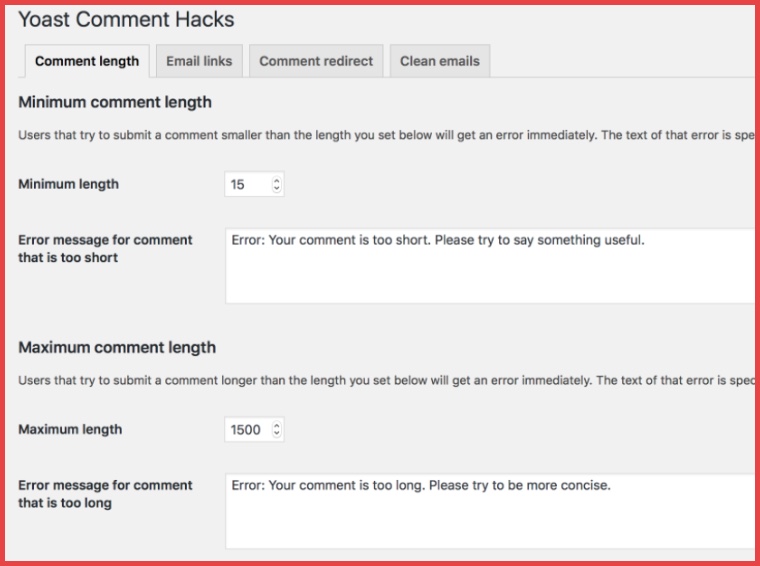
7. Yoast Comment Hacks
Yoast Comment Hacks is a plugin from the Yoast SEO team that makes a few minor tweaks to how your comments section functions.
One of the neatest features is a new button in your interface that lets you email all commenters on a specific post. The admin users also get new links in the comment section to email individual commenters directly.
Another helpful feature lets you redirect first-time commenters to a special thank you page. Like Thank Me Later, you can use this to connect with your commenters and thank them or promote something. Only, with this feature, you connect on your own site rather than using the email.
Yoast Comment Hacks
Add caption
Other helpful features include:
  • Better comment notification emails
  • Option to disallow comments that are too short or too long
  • Some other basic maintenance options
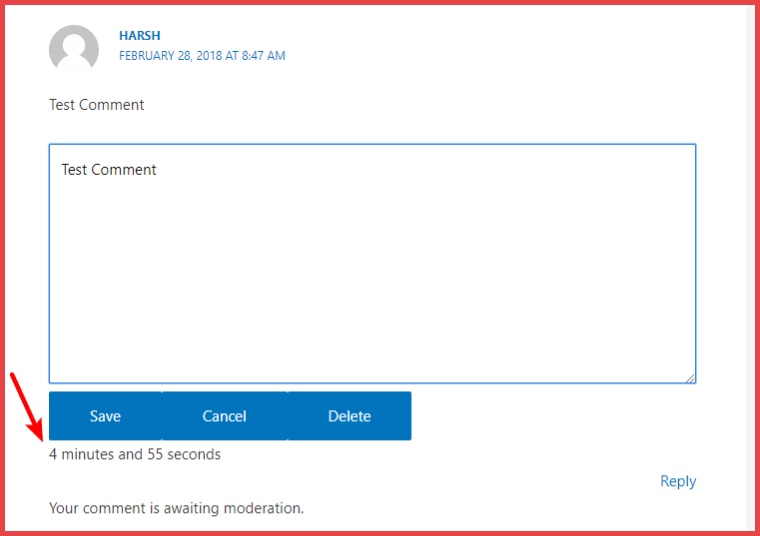
8. Simple Comment Editing
How many times have you left a comment on a blog only to realize that you made a mistake right after hitting the submit button?
Simple Comment Editing helps your visitors avoid that feeling by giving even anonymouscommenters the option to edit comments after they click submit.
Don’t worry. They can’t edit comments forever (that would cause all kinds of problems).
Instead, they only have 5 minutes to edit their comment. This ensures that they have enough time to fix mistakes, but not so much time that they can change a comment’s meaning after other people have interacted.
To use this plugin, you simply install/activate it and it starts working right away – no configuration needed:
Simple Comment Editing
Add caption
Note: If you decide to use wpDiscuz, you don’t need this plugin because wpDiscuz already includes comment editing for anonymous users.

Use These WordPress Comment Plugins To Help Visitors Engage Better On Your Blog

As you can probably guess, I like Thrive Comments the best (otherwise I wouldn’t be using it on this site).
wpDiscuz is also another good option to add a lot of functionality to your comments section using one plugin.
And if you want some smaller enhancements, all of the other plugins add valuable features – they just don’t completely replace your comments section like Thrive Comments or wpDiscuz.
Want to talk about comments even more? Leave a comment and let’s see an active comments section in action!
Here are a few hand-picked articles for you to read next:
Add caption
Add caption

Impressions vs. Clicks, CPC vs. CPM & PPC vs. CPC Know the Difference


Stumble
If you are also confused between Impressions vs. Clicks, CPC vs. CPM and PPC vs. CPC this post will help you understand these Internet Marketing Basic Terms and help you to understand the difference.
It is the age of digital marketing.
In fact, digital marketing has become as common as sliced bread.
Moreover, the usage of Smartphones for accessing the web has propelled the growth of digital marketing.
Mobile web usage has surpassed desktop usage.
And the margin between the two continues to grow.
However, in spite of the huge popularity of digital marketing, many people don’t understand these internet marketing terms and not able to understand the difference in two terms.
For them, web terminology is utterly confusing.
So, today we take up some of the very important terms in digital marketing that have been widely misunderstood by newbie internet marketers.
The post features three sections wherein we take a detailed look at the following terms used in digital marketing:
  • Impressions vs. Clicks
  • CPC vs. CPM Ads
  • Pay Per Click (PPC) vs. Cost Per Click (CPC)
The post helps you to be more informed about these terms.
You get to know what they mean.

Impressions vs. Clicks

To begin, let me first tell you that both Impressions and Clicks are related to the payment method used in the world of online advertising.
They measure the effectiveness of your advertising campaign.
In fact, the terms Impressions and Clicks are the most common terms used in digital marketing.

What is Impression?

Impressions are the most basic interaction that you can have with a page. Moreover, it can hardly be termed as an interaction.
In fact, an impression is a view.
When you ad is loaded and displayed in front of a user, that is recognized as one impression.
So, an impression is simply a view of your ad.
One view = one Impression.
It could be a text ad, banner ad, or video ad.
Impression Ad
Add caption
Simply put, it is the number of times that ad appeared on any computer screen anywhere in the world.
In case, a person sees your ad multiple times; they will be counted as multiple impressions.
However, unique impressions result when a unique number of people see your ad, regardless of the fact that how many times they viewed it.
When the same people get to see your ad on multiple devices (desktop, phone, or tablet), they get counted as a unique impression for each device.
Now, the question arises, what’s the point in having impressions.
Well, you can’t generate clicks without impressions.
Users have to see your ads before they go on to click them or not.
It is known as CPM or Cost per Mille. Here, Mille means thousand. So, if you are paying $2.0 CPM, $2.0 will make you earn 1000 impressions on your ads.
Here, it is important to note that as an advertiser, impressions are the least advantageous way to purchase advertising.
In spite of the fact that your ad is being viewed, but is it really does something for you?
As an advertiser, CPM ads can be useful for brand awareness as you can show your ads to a large audience for the very low price.
For publishers, CPM can be a good option if they get fewer clicks on the ads on their website. As they don’t have to worry about clicks they can earn on ad impression (CPM basis).

What are Clicks in Online Advertising?

Now, we move on to clicks.
A click is said to occur when a user clicks on the advertisement. It is a bit more involved.
In CPC or Cost Per Click advertising option advertiser only pay for the click.
You can also run advertising that goes on to pay you for every X number of clicks. In either case, the click turns out to be the basic unit of measurement.
Clicks in Online Advertising
CPC is more of a pricing model.
However, it can also be used as a metric.
Google AdWords is the best-known company that uses the CPC pricing model. It charges on per click basis.
So, the advertiser needs to come up with excellent ads that are worthy to be clicked on. It is beneficial for the advertiser as well as the platform.
So, you see that clicks are much more relevant than impressions.
In fact, you need to get an impression to get a click. Likewise, you require a click for getting a conversion.
That said, people can also find your site through other means and convert directly, without even seeing your ad.
However, all clicks do have a potential for leading you to conversions. That’s the reason why clicks are so important.
Here, it is also important to brief you about Click-through Rate (CTR).
CTR is used to measure the percentage of people who go on to click your ad from the total impressions.
For instance, if you had 10000 impressions out of which 100 clicks were generated, then the CTR would be 1%.
For having a good CTR, it is important to concentrate on the ad creative.
So, the “ad looks” plays a big role in determining whether a user clicks on your ad or not.
That said display ads have an average CTR of about 0.6%.
For Google or Bing Ads, a CTR of 2% is considered pretty well.
A conversion might result after a click. It is much more valuable than a click. A conversion is an action taken by the user such as:
  • Making an online purchase.
  • Filling out a form.
  • Signing up for eNewsletter.
  • Downloading an eBook.
Click ads or CPC ads are good for both advertisers and publishers.
Advertisers have to pay only for clicks and not for impressions, so they only pay when visitors visit their website.
Compared to CPM ads CPC ads cost more.
For publishers, if they can get good clicks on their ads, CPC ads are the best option for monetization. They can earn good money by using CPC ads on their website.
The best example of CPC ads is Google AdSense for publishers and Google AdWords for Advertisers.
So, Impressions show up your ads, whereas Clicks leads to the visitor.
However, we would like to emphasize that you need to optimize your ads to derive maximum advantage from your digital marketing efforts.
The best ways to do it is through testing, experimentation, repetition, and iteration

CPC vs. CPM Ads

Now have a look at CPC vs. CPM Ads and find out the difference in which is effective ad model.

What is Cost per Click (CPC)

Cost per Click (CPC) is an online advertising pricing model where advertisers have to pay only when their Ad is clicked upon, not each time when an Ad is shown.
In this type of pricing model, advertisers are safe and have to pay each time when their Ad is clicked, but they have to make sure that their ad attracts the viewer, and they click on your ad.
Cost per Click Ads (CPC vs. CPM Ads)
This makes them sure that their ad campaigns are relevant so that a click stands a good chance of being converting into an action.
This pricing model also requires that publishers bear the responsibility of displaying the Ads in right places on their websites so that Ads receive clicks.
So, CPC simply translates into “no clicks, no revenue” pricing model for publishers.
Thus, it is a very simple formula for both sides.
Perhaps the elements of sharing risk and the overall simplicity in measuring performance are the main focal points which have made CPC pricing model so successful with advertisers and publishers.
For example, CPC pricing model has been widely successful on search engines like Google and Bing.
Today, Google generates billions of dollars in revenue by acting as a middleman between advertisers and publishers.
Google shows Ads on the search engine results page and also on another website wherein it acts as a publisher.
The success of CPC model has been instrumental in shaping up an entire industry where big shot companies pay search engine marketers for handling their advertising campaigns.
So much so, that there has been a marked shift in advertising expenditure towards the online world.
However, in spite of the big benefits of CPC pricing model, there is one noticeable problem in adopting this online advertising model.
Actually, Cost per Click Ads is subject to click frauds.
Herein, there is a possibility that network of people gets involved in clicking on Ads with whatsoever no interest in products or services that are being sold or advertised.
This can be to drive up advertising costs, or it can be an attempt to generate revenue by clicking on Ads that show up on publisher’s website who is also involved in fraud.
Having said this, Google has played a vigilant role in combating such frauds.
The best testimonies are the millions of dollars that are being regularly pumped into CPC pricing model.

What is CPM (Cost Per Thousand Impressions)?

Cost per thousand Impressions (CPM) is the oldest online advertising pricing model.
It is an advertising model which is used on websites wherein advertisers have to pay when their Ad is shown for a certain number of times regardless whether it is clicked on or it is not clicked.
CPM Ads
At the initial stages, CPM was actively promoted by big portals such as AOL and Yahoo.
It turned out to be a great revenue generator for them being largely risk-free.
In this pricing model, the advertisers did all the creative work of designing their Ad campaigns and made the payments.
The portals only had to display the Ads as often as they could until the budget got exhausted.
So, this online advertising model was one-sided and didn’t offer any guarantee of performance.
Usually, Publishers prefer to bill on impressions as CPM is not a performance-based advertising model.
Simply put, publishers bear no risk on ad performance with a CPM advertising system and get paid on every impression.
CPM can be better for the advertiser if they want to be spread brand awareness.
With big attractive banners, they can spread their brand name easily at a low price.
Second, if the advertiser can generate high CTR on their banners, it can reduce cost per click.
Say CPC model is charging $0.5 per click and CPM is charging $5 per CPM and on CPM ads, the advertiser is getting 20 clicks on per 1000 ad display.
His cost per click will be $5/20= $0.25, so he is paying 50% less than CPC model.

CPC vs. CPM – which is Better?

Going by the above description, CPC comes out to be the clear winner.
A click is always much more worthy than an impression.
However, you also have to consider other factors such as costs and goals.
The cost is a primary difference between CPC and CPM.
Impressions cost far less than running CPC Ad campaigns.
For example, you might buy an ad at $1 CPC. Whereas, you might buy an ad for $15 CPM.
Thus to equal the effectiveness of CPC ad, you just need 15 clicks out of 1000 Impressions.
This means that you require 1.5% of the people (who see your ad) to click on your ad, to make your ad equally as effective and equally as expensive as a CPC ad.
So, it ultimately turns out that CPM ads are more fickle. Going with CPC ad campaign, you pay for a guarantee of a certain number of clicks.

Why should you go for CPC Ad Campaign?

Primarily you should go for CPC Ad Campaign as you are only charged when people click on your ads.
This translates into the fact that you can get thousands of “free impressions.”
As an advertiser, you always want to pay for ads that generate results for you and in that sense; CPC allows you the freedom to pay only when your ad receives a click.
And moreover, when you have a low budget, and you don’t have enough time for ad optimization, CPC can be the best option for you.

Why should you go for CPM Ad Campaign?

CPM Advertising Model is often used by people running tens, hundreds, or even thousands of ad combinations.
CPM campaigns provide you the opportunity to maximize your performance beyond a stated bid rate and figure out the lowest possible bid.
Moreover, CPM bid has no connection whatsoever how well your ads perform.
For example, if CPM bid is $1.00 per 1000 impressions and your CTR (click through rate) is exceptionally high, you can be successful in obtaining a CPM of as low as $0.10 despite the fact that you bid at the rate of $1.00.
Having said this, with CPM Ad Campaigns you should closely monitor your ads because:
There is every possibility of exhausting your budget on low performing Ads. Plus, your ad performance can decrease over time, pushing your effective CPM up over time.

The Ultimate Decision – CPC or CPM

This decision ultimately depends upon your Ads and what follows next.
In case your sales funnel effective, but your ads are not that good, then CPC is the best choice for you.
However, if your Ads are good, but your sales funnel is not as effective, then CPM will prove to be a better choice for you.
And moreover, going by the above description it can be easily deduced that CPC online advertising pricing model stands out as a better choice for businesses looking to advertise online through various powerful platforms such as Google, Facebook, LinkedIn, etc.

PPC vs. CPC (Pay per Click vs. Cost per Click)

If you are relatively new to the world of digital advertising, chances are quite high that the terms such as PPC and CPC can prove to be a little overwhelming to you.
Hereunder, we go on to explain these terms so that you can have a better understanding what these terms mean.
Let’s get started:

What is PPC?

Well, PPC is a type of digital advertising channel wherein the advertiser pays for each click on one of their ads.
It can be a fixed amount of money, and it can also take the form of a fixed daily budget where the value of each click fluctuates based on factors such as competition and search volume.
PPC Ads (PPC vs. CPC)
Here, we need to state that the alternative to paying per click is paying for “impressions” which are ad views.
In fact, impressions are measured by cost per 1000 impressions, CPM.
The benefit of PPC is pretty obvious.
You don’t have to pay unless somebody clicks.
Well, any conversion begins when a user clicks on an ad.
So, using PPC, you move ahead towards conversion.
Platforms such as Google AdWords and Bing Ads use PPC model wherein they allow advertisers to bid on keywords that are connected with their businesses.
Moreover, PPC Advertising channel helps to drive traffic to your website and convert them into customers.
It is also used with social media platforms (Facebook, LinkedIn) for reaching target audience based on specific demographics, and interests.

What is CPC?

CPC or Cost per Click is a metric that is used to measure the cost per click.
In other words, CPC measures the success of online ads. When an ad is clicked, it costs a certain amount of money. The goal is to have the lowest CPC possible.
CPC communicates the cost that you are actually paying per click on your advertising program.
It varies depending on factors such as competition for the keyword as well as fluctuations in search volume.
A bidding process determines the CPC cost.
It is an agreed-upon fee when a viewer goes on to click the ad.
Cost per Click helps you to know how expensive a term is against the relative benefit of having those clicks.
When you know CPC, you can decide what terms to bid on when calculating the ROI for a campaign.
Lastly and most importantly for you, your goal should be to get the lowest CPC within your PPC or CPM advertising campaigns.
For example, in CPM ads you placed an advertisement at $5 per CPM, and you got ten clicks for that CPM now your effecting CPC will be $5/10= $0.5 per click. So your goal in CPM ads will be to get as many as clicks.
If you are using PPC model as good CTR, you will get the cost of a click will be reduced as Google AdWords look for high CTR and charges less amount then what you have bid.
Say you have set per click cost to $0.25 and you are CTR is very low as 0.5% then your effect CPC may be $0.25, but if you are getting good CTR sat 3% Google AdWords may charge you only $0.2 per click.
By this way, you can reduce your per click cost.
With this, we come to the end of this presentation.
We hope that the post has given you much understanding of the different acronyms used in the digital advertising world.
Now, we are sure that you have much deeper knowledge of online advertising terms.
If you liked the post, please share it on Facebook, Google Plus, and LinkedIn. We welcome your comments and suggestions.